
Connecting to AWS IoT
Tutorial for sending collected industrial data to AWS IoT Core or Sitewise with the nodeG5 Industrial IoT Gateway
Note: This tutorial assumes that you have already set up your nodeG5 gateway to receive local device Modbus (see our sample tutorial) or CAN bus data and now you want to configure the gateway to connect and send data to an AWS IoT end-point using secure MQTT messaging.
At a Glance
-
Rugged CE, FCC & RCM edge Industrial IoT Gateway for Modbus (TCP/RTU) Serial RS485, CAN Bus (J1939/ISO15765), OPC UA, BLE & WiFi devices.
-
Securely send data to an AWS IoT Service.
-
Run edge applications using Python scripts, Docker or services like AWS Sitewise & TensorFlow
-
Backhaul via WiFi, Wired Ethernet or cellular LTE/4G
What You Need
-
A nodeG5 IoT Gateway set
-
A working internet connection
-
An AWS IoT Account

Contents
1. Create a new AWS IoT Thing
First log into your AWS IoT Management Console and create a Thing:
AWS IoT > Manage > Thing > Create
Next go to:
Secure > Certificates
Then download the 'Certificate' & 'Private Key File'.
Ensure the Certificate is "Active", otherwise activate it under ACTIONS in
Things > Your Certificate > Security

2. Update your nodeG5 IoT Gateway
Create a new local folder and name it "AWS".
Save the downloaded certificate files into this folder and rename them as the following:
"certificate.pem.crt"
"private.pem.key"
Next zip the folder (ensure that you zip the entire folder and not just the files inside).
Then log into your nodeG5 web console and go to the <Management> tab.
Patch the zipped folder to the gateway using the UPDATE FIRMWARE button.
3. Create a Security Policy for your Thing
In your AWS IoT Management Console go to:
Secure > Policies > Create
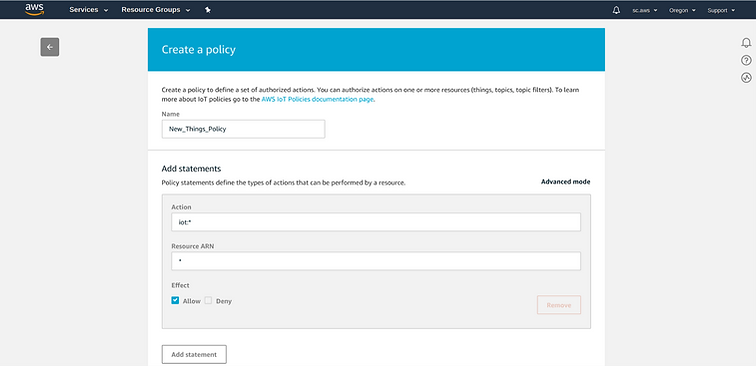
At <Things>, select your new Thing then click on
Security > Certificates > Policies
Under <Actions>, choose to Attach a Policy:

4. Configure your nodeG5 IoT Gateway to send data to your AWS Account
Now, you are ready to configure your gateway to send AWS IoT endpoint to feed data to your AWS applications.
First, get your AWS endpoint from your 'AWS IoT > Settings' page. In the example below the endpoint will be "a33rz5d1ue817h-ats.iot.ua-west-2.amazonaws.com'.

Then go back to go your AWS IoT console and subscribe to the Topic to "Test" that data is being received.

Congratulations! You have succesfully sent your Modbus or CAN bus data to your AWS IoT endpoint and ready to, for example, push the data to a S3 bucket using a Rule in 'Act > Rules'.
The nodeG5 AWS IoT client side is built using AWS IoT Device SDK for Python and users are free to install, modify our device client codes for enhanced edge capabilities or other required functionalities.
Next, in the nodeG5 web configuration menu, go to the <IoT Client> tab and configure your AWS client settings according as per your AWS end point and Thing settings. Then REBOOT your gateway.
