
TECHNICAL FAQ PAGE
Gateway Set Up
Reading Test Data
Connecting Sensors & Devices
MQTT Cloud Connectivity
What is the Default Login for my gateway?
For the nodeG5
-
URL: 192.168.1.1
-
User Name: admin
-
Password: node12345
For the FATBOX G3
-
URL: 192.168.1.1
-
User Name: admin
-
Password: fatbox12345
I am unable to connect to my gateway
The following steps can be taken to troubleshoot a failure to connect to your gateway.
1. Check if the Ethernet cable is connected to the correct Ethernet port (ETH0)
2. If using Windows. Check the following:
-
network and sharing center>adapter setting> ethernet>internet protocol V4
-
Check the “obtain IP address automatically” option.
I am unable to connect to my Network
The following steps can be taken to troubleshoot a failure to connect your gateway to your required network.
1. Check if the antenna is connected to the right port
2. Check you have put the right APN details into the network setting (provided by your Telco)
I am unable to connect to my Dynamic DNS
The most common issue with a failure to connect to Dynamic DNS is a SIM card without a public IP address.
1. This can be verified by checking with your Telco.
2. Another way to check is to log in to the gateway and go to status>IP address.
If your IP address is within the following ranges, it is a private IP and cannot be used with Dynamic DNS
172.16.0.0 to 172.31.255.255
or
10.0.0.0 to 10.255.255.255
How do I read the data from the Starter Kit (temp sensor) and the iotasset.txt file?
To read the data from the starter kit and iotasset.txt/dataq.txt file you will need a program like putty or winscp. Click here to download Putty and here to download Winscp.
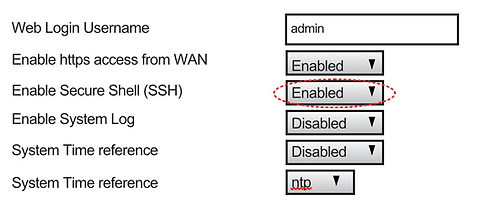
1. Connect the gateway ETH0 port to your computer. Go to the <Management> tab in the web configuration menu. Enable the SSH option (see blow) and click the UPDATE button to save your settings.
2. Launch the putty/winscp program.
3. Login to the gateway using the following details:
For nodeG5
username- root
password – node12345
For FATBOX G3
username- root
password – fatbox12345
4. Go to the /tmp directory and access the dataq.txt file. You would be able to see the value of the temperature sensor under 2AIN1 in the dataq.txt file.
Can we check our data before our cloud dashboard is set up?
It is possible to read the data from the gateway and iotasset.txt/dataq.txt file without putting it on a cloud dashboard like Azure or AWS. You will need a program like putty or winscp. Click here to download Putty and here to download Winscp.
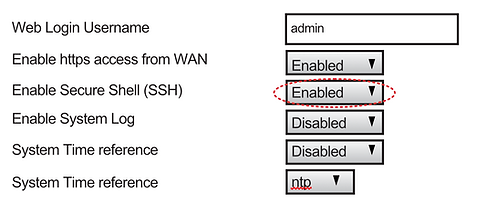
1. Connect the gateway ETH0 port to your computer. Go to the <Management> tab in the web configuration menu. Enable the SSH option (see blow) and click the UPDATE button to save your settings.

2. Launch the putty/winscp program.
3. Login to the gateway using the following details:
For nodeG5
username- root
password – node12345
For FATBOX G3
username- root
password – fatbox12345
4. Go to the /tmp directory and access the dataq.txt file. You would be able to see the in the dataq.txt file.
What is the iotasset.txt file?
We use the term 'asset' to refer to the attached device slaves.
The gateway integrates a ‘device server’ that will poll all attached i.e. Modbus RTU and TCP slaves at a configure period. This server reads a configuration file ‘iotasset.txt’ that is a simple text file to query data from such slaves and create JSON strings in the gateway's data buffer.
You can refer to the following example to understand how each polled Modbus device register is specified:
#comments below are for explanation, please do not include them in your iotasset.txt file.
MBM_START
TYPE,R #R=RTU and T=TCP
ADDR.3 #slave address on Modbus RTU network
MBFC,3
REGS,8, 1, UINT16HL #data address, #of registers and function code
Site,Azure IoT Starter Kit
Eqpt, DIGIRAIL.4C.CH1 #digital input 1
Unit,NA
Key,Switch.CH1
TYPE,R
ADDR,2
MBFC,3
REGS,14,1,SINT16HL
Site,amplified.com.au
Eqpt,DIGIRAIL.2A.CH1 #analog input 1 Temperature Sensor
Unit,Celcius/100
Key,Temperature.CH1
TYPE,R #this is example to read VOLTAGE from a Modbus ABB Power Meter
ADDR,4
MBFC,3
REGS,4098,2,UINT16HLhl
Site,Azure IoT Starter Kit
Eqpt, ABB Power Meter
Unit,Volts
Key,Volts.ABB
MBM_STOP
Please refer to our Modbus User Guide for further details.
How do I install the iotasset.txt file to my gateway?
To upload a new iotasset.txt file to the gateway first log into the web console and go to the <IOT Hardware> tab.
Click on 'UPDATE FIRMWARE' in the Firmware Update section

In the new window, click on 'CHOOSE FILE' and select from your local folder the updated iotasset.txt file.
Then click 'UPLOAD FIRMWARE FILE'
If the firmware update has been successful, you will see the message below.
"RESULT: The file iotasset.txt was uploaded successfully"
After closing the page, you will need to login again for security purpose.
If the update failed, please check that the connection to the gateway is stable. Or else please contact support@amplified.com.au
You can also physically upload the configurations without network connectivity the following way:
For MAC users
Open a terminal session and run the following commands:
> cd <folder where you saved the iotasset.txt> i.e."cd documents"
> scp iotasset.txt root@192.168.1.1:/user
> enter in the password for your nodeG5 [default is node12345].
You can run the following commands to check that your iotasset.txt is loaded:
> ssh root@192.168.1.1
> enter the password.
> cd /user
> ls [check to see if there is a iotasset.txt file in the list]
> cat iotasset.txt [verify the contents of the iotasset.txt file]
Go to the <Management> tab to REBOOT the nodeG5 to save your settings.
For Windows Users
Go to the <Management> tab in the web configuration menu. Enable the SSH option (see blow) and click the UPDATE button to save your settings.
Next run the Winscp and connect using the following File Protocol
> SCP Hostname: 192.168.1.1
> User/password: root/node12345
> Drag the iotasset.txt file over to the /user directory
You can run the following commands to check that your iotasset.txt is loaded:
> ssh root@192.168.1.1
> enter the password.
> cd /user
> ls [check to see if there is a iotasset.txt file in the list]
> cat iotasset.txt [verify the contents of the iotasset.txt file]
Go to the <Management> tab to REBOOT and save your settings.
Repeat step 3D in this guide to check whether your gateway is now collecting data from the sensor. If you still do not see any data or message, please contact our technical support at: support@amplified.com.au
How to configure the iotasset.txt file to your device?
The specific configuration guides for each of Modbus or CANbus type device can be found here:
It might be useful to check out our tutorial for setting up a Schneider energy meter to the nodeG5 edge IIOT gateway.
For further help please contact our technical support team at support@amplified.com.au
(note: we will help our customers develop examples with their specific device provided with their Modbus register document available.)
Installing and running Mosquitto MQTT
Our detailed write up of how to install and run the Mosquitto MQTT client on the nodeG5 can be found in our application note here.
What is our default MQTT data format in the data buffer?
The data buffer is 'standard' JSON format for Azure. Here is an example of how it looks like.
[{“DeviceId”:”FATBOXG3”,"AssetId":"Device01","RecOn":"2018-02-10T14:59:00Z","Val":23.5}]
If your application requires a different format, you can send us an enquiry to support@amplified.com.au.